Using VMWare Workstation VMDK image in ESXi
If you are in a scenario where you have a VMDK file from either converting it from a different hypervisor, can’t use vCenter Converter or just uploaded the image to the datastore without converting it first and got the failed to open disk scsi0:0: unsupported or invalid disk type 2 error, you’re in the right place.
This information is based on VMWare’s KB1028943 but used on vSphere ESXi 6.5.
This guide requires for the VMDK to be uploaded to the ESXi datastore.
Precautions to follow
If you tried to power on a VM with the affected VMDK, you should detach it before you proceed.
As a best practice, you should also make sure you have backups and your network is secure before you proceed to enable SSH on your ESXi host.
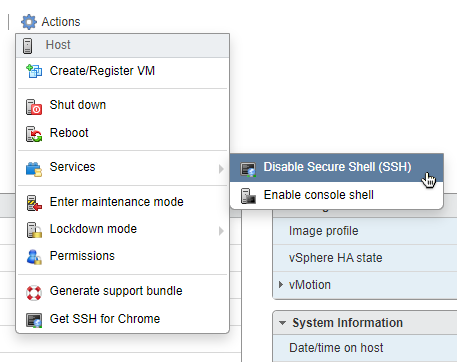
Enabling SSH
Log into your ESXi control panel and enable SSH in the Actions menu.
Use your credentials that you use for logging into the web-based control panel. Generally, you do not need to log in as the root user to run the vmkfstools commands. However, some commands, such as the file system commands, might require the root user login. If you encounter errors, log in as root.
Finding your VM image
Once you SSH into your host, we need to locate the datastore where the image is located. Datastores are located in /vmfs/volumes/.
The ESXi Shell can be disabled by an administrative user. See the
vSphere Security documentation for more information.
[root@prod-esxi-01:~] cd /vmfs/volumes
[root@prod-esxi-01:/vmfs/volumes] ls -lah
total 1796
drwxr-xr-x    1 root     root         512 Feb 24 13:41 .
drwxr-xr-x    1 root     root         512 Feb 22 16:58 ..
drwxr-xr-x    1 root     root           8 Jan  1  1970 524a2e90-91730db2-4296-3c4a9277a920
drwxr-xr-t    1 root     root       72.0K Feb 24 11:58 524a3b4b-eadd95e6-cfc5-3c4a9277a920
lrwxr-xr-x    1 root     root          35 Feb 24 13:41 SYNOLOGY-ISCSI-01 -> 524a3b4b-eadd95e6-cfc5-3c4a9277a920
drwxr-xr-x    1 root     root           8 Jan  1  1970 bcc631ed-a78ae0c8-b91a-b41b07a0b010
drwxr-xr-x    1 root     root           8 Jan  1  1970 fe981dec-ddc55ab8-420a-1571376a12fd
We can see the specific datastore. Locale the affected VMDK image.
VMDK Conversion
In order to convert the image, we have to use vmkfstools. To use this command, add the -i flag followed by the image you want to convert and then the destination of the converted image.
vmkfstools -i /vmfs/volumes/YourDataStoreHere/vm.vmdk /vmfs/volumes/YourDataStoreHere/vm-converted.vmdk
If the image is thick provisioned and you want it to be thin provisioned, you should also add the -d thin option flag.
vmkfstools -i /vmfs/volumes/YourDataStoreHere/vm.vmdk -d thin /vmfs/volumes/YourDataStoreHere/vm-converted.vmdk
You will see something similar to this:
[root@prod-esxi-01:~] vmkfstools -i /vmfs/volumes/SYNOLOGY-ISCSI-01/zabbix-vmware.vmdk /vmfs/volumes/SYNOLOGY-ISCSI-01/zabbix-vmware-converted.vmdk
Destination disk format: VMFS zeroedthick
Cloning disk '/vmfs/volumes/SYNOLOGY-ISCSI-01/zabbix-vmware.vmdk'...
Clone: 91% done.
After the process is done, there are two ways you can attach the converted image to the VM:
- Detach the old VMDK and attach the new image with a different one to the VM in the ESXi UI
- Remove the old VMDK and rename the newly converted one to use the same filename as the old file. You WILL have to de-register and register the VM for the system to detect a change.
If you’re on something like CentOS or RHEL, you’ll also find this guide handy.