Network booting CentOS 7 via iPXE PXE bootstrapping and Windows IIS
This guide is using Windows Server 2016, WSL Ubuntu, Mikrotik RB751U-2HnD and VMWare Workstation. This is an experimental home lab setup and should not be used in production. This exists only because there’s barely any iPXE information that explains in one page how to get the whole thing running.
iPXE is very powerful, but very hard to learn. You’ll spend most of your time trying to figure out why something is not working. Do not try to boot ISOs, it will look like things work, only for it to crash. It will be a frustrating process, but once you get it working, you’ll see how wonderful it is. I’d recommend testing things with a VM.
Your setup may wary, but same things apply.
Compiling our iPXE binary
First thing first, we need to know which domain/IP address will the serving our files. In my case, my Windows server running IIS is located on IP 10.1.69.5.
Install these required packages first:
sudo apt install build-essential liblzma mkisofs perl xz-utils mtools liblzma-dev git
Then clone the iPXE repo.
git clone git://git.ipxe.org/ipxe.git
In the src folder in the repo we cloned, there should be a file called boot.ipxe that we need to modify. If it doesn’t exist, create it. You can put your menu into it, but I’d recommend serving the menu itself via HTTP, as it makes edits far easier and you don’t have to recompile and replace the package in TFTP. This is how boot.ipxe looks for me. Notice the shebang indicating that this is an iPXE script. We need to define dhcp so that the host gets the IP and information from the DHCP server.
#!ipxe

dhcp
chain http://10.1.69.5/menu.ipxe
We will be needing only the undionly.kpxe file, so lets compile it.
make bin/undionly.kpxe EMBED=boot.ipxe
Setting up DHCP Server and TFTP server
Mikrotik can serve as a TFTP Server, but to make things simplier, I’ll be using Tftpd64 on the Windows server itself.
We will be bootstrapping our own compiled iPXE code, but to get it to work, we need to set DHCP option 66 to the TFTP server and option 67 to our iPXE menu/script. Option 67 is the filename that the host will look for when connecting to TFTP server.
On Mikrotik, option 66 is Next Server and option 67 is Boot File Name. Setting DHCP options manually in the options tab will NOT work unless enabled in the DHCP Network panel, which already has Next Server and Boot File Name options already.
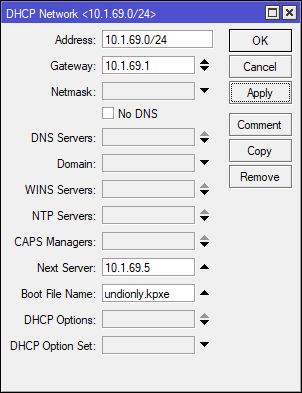
Drop your undionly.kpxe file into the tftpd64 directory to make the file available via tftp. Make sure you allow tftpd64 through the firewall.
Setting up IIS
This assumes you already have an IIS default page made already. You’re good to go with dropping your menu.ipxe file and your setup files, but there’s one problem. IIS by default serves only specific MIME type files, and since most Linux files have no extension, we have to enable all MIME types to be served.
Create a new web.config file in your IIS website directory and paste this in:
<?xml version="1.0" encoding="UTF-8"?>
<configuration>
    <system.webServer>
        <directoryBrowse enabled="true" />
        <staticContent>
            <mimeMap fileExtension=".*" mimeType="application/octetstream" />
            <mimeMap fileExtension="." mimeType="application/octetstream" />
        </staticContent>
    </system.webServer>
</configuration>
This will make IIS serve all MIME type files.
In IIS, we also have to allow double escaping. Click on the Request Filtering icon in IIS, Edit Feature Settings, and Allow Double Escaping.
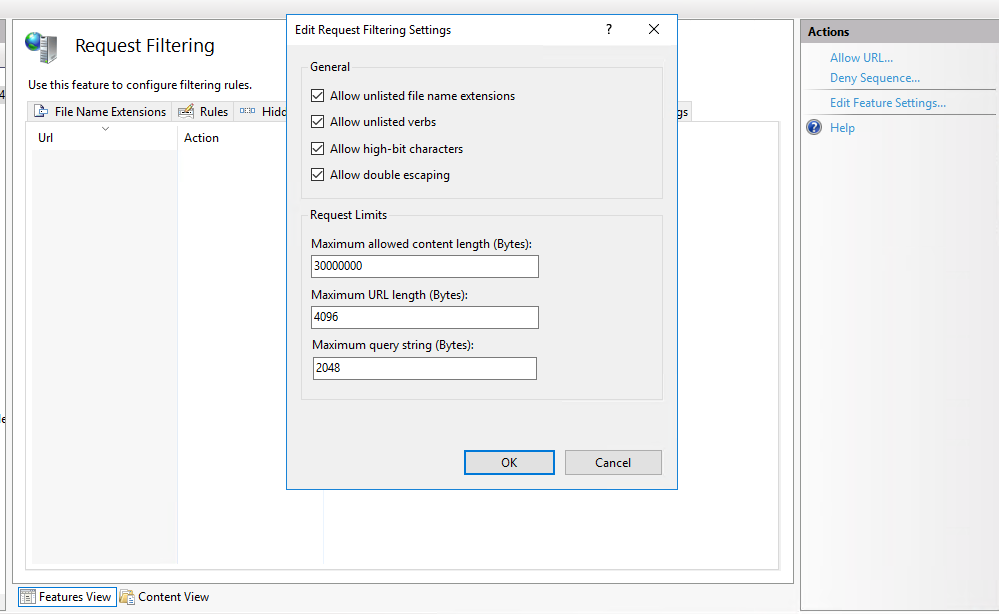
If we don’t do this, IIS will 404’d on packages like libstdc++
Extract the ISO files
This one is fairly straightforward. Extract the full contents of the ISO file you downloaded into a folder, so that all of the content is accessible through a web browser. In my case, I extracted the ISO to \wwwroot\iso\CENTOS-1908\.
Writing your menu.ipxe file
This is a file undionly.kpxe chainloads after loading iPXE.
#!ipxe

menu Steak's iPXE menu
item centos7-setup CentOS 7
item
item ipxeshell iPXE Shell

choose os && goto ${os}

:ipxeshell
shell

:centos7-setup
set base http://10.1.69.5/iso/CENTOS-1908/
prompt -k 0x197e -t 2000 Press F12 to install CentOS... || exit
kernel ${base}/images/pxeboot/vmlinuz initrd=initrd.img repo=${base}
initrd ${base}/images/pxeboot/initrd.img
boot || read void
If you want to boot CentOS 7 directly off the official repos and download stuff off the internet, you can replace the local URL with http://mirror.centos.org/centos/7/os/x86_64/.
Be aware that each distro has their own different approach to network booting. If for example, we wanted to boot Ubuntu LiveCD, we’d have to create a NFS server serving the Ubuntu files, compile iPXE with NFS support and our configuration would look something like this:
kernel http://10.1.69.5/iso/ubuntu/casper/vmlinuz || read void
initrd http://10.1.69.5/iso/ubuntu/casper/initrd || read void
imgargs vmlinuz initrd=initrd root=/dev/nfs boot=casper netboot=nfs nfsroot=10.1.69.5:/ubuntu ip=dhcp splash quiet -- || read void
boot || read void
Fixing repodata
Because we are doing something that was never intented to be done, we need to manually do some fixes to the repodata folder. Depending on which form of ISO extraction you used, the files in repodata will have their extensions cut off.
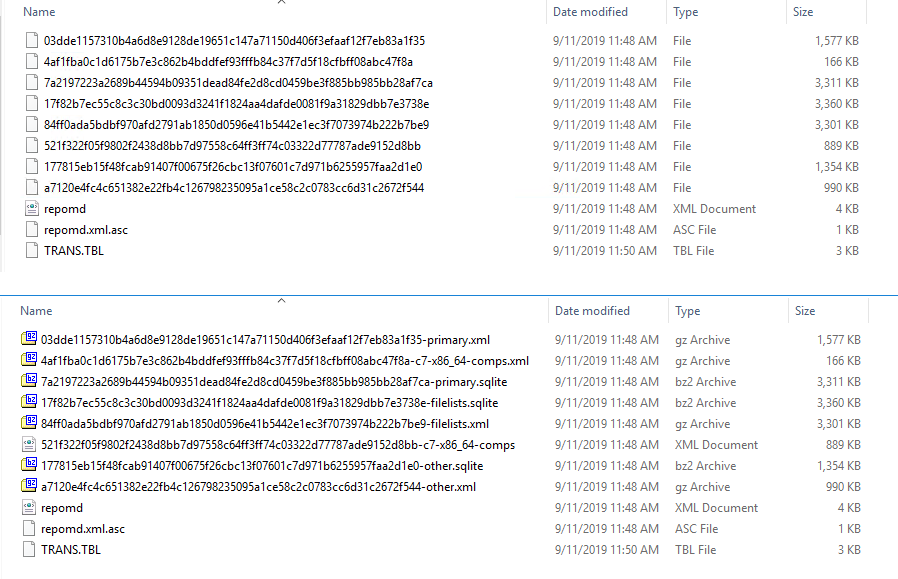
Top is before and bottom is after.
Open the repomd.xml file and rename the files based on it, so for example 84ff0ada5bdbf970afd2791ab1850d0596e41b5442e1ec3f7073974b222b7be9 becomes 84ff0ada5bdbf970afd2791ab1850d0596e41b5442e1ec3f7073974b222b7be9-filelists.xml.gz and so on.
Testing iPXE through VMWare Workstation
Create a new VM in Workstation and remember where its created. If you can’t find it when setting up a new VM, open the VM settings and go to options. Working Directory contains the VM files. Go to it and open them .vmx file. After the first line, add bios.bootdelay = 10000 to delay the boot by 10 seconds. The network adapter needs to be bridged to the physical network to function correctly.
Testing out things
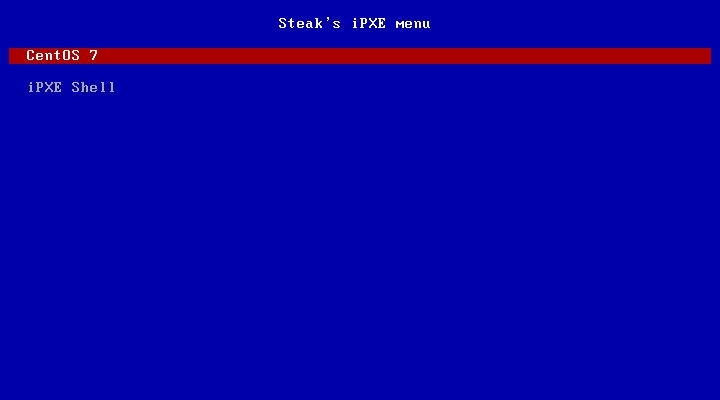
It is time to see the fruits of your own labor. Boot up the VM and press F12 to network boot. If the IIS web server is configured correctly, you compiled iPXE with no problems and the DHCP option is functional, you’ll be greeted by something like this.
Boot into CentOS. If you did things correctly and manually fixed the repodata, you’ll see the installation source and software selection working.
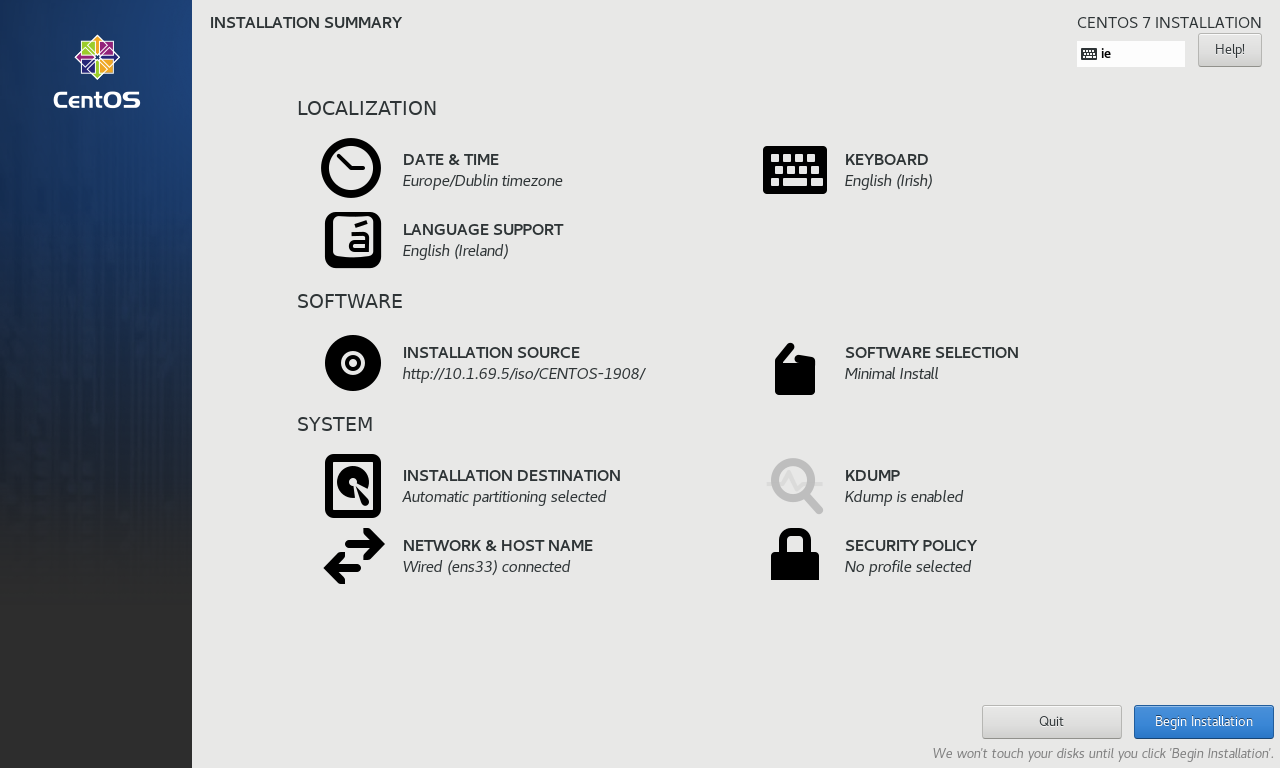
The battle is not over yet. Try installing the system to make sure anaconda and yum is able to pull packages from the webserver without hitting 404 errors.
If it installs sucesfully, congratulations! You got yourself an iPXE server with functional CentOS 7 installer.