Combining multiple skinned meshes into a single mesh while keeping the skinning in 3DS Max
If you end up with a model that is split into several meshes, either by not planning ahead, finding it easier to skin the meshes individually or you purchased a model split into several parts, there’s not a good way to combine all of them into a single mesh without losing all of the skin data.
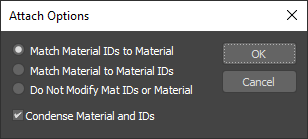
First, clone all of the meshes you want to combine into a new layer, preferably select the biggest mesh and delete the skin modifier on it. Now select the Editable Mesh modifier and click on Attach List, selecting the mesh parts you want to combine. Keep in mind that this possibly destroy your smoothing groups that you will have to recreate and you will have to select the correct option depending how your model UVs are set up.
Now that we have ourselves a single mesh, open up the Modifier List rollout and select the Skin Wrap modifier. After that, unhide the original meshes we cloned and add all of them into the Skin wrap modifier with the Add button. You can also add the meshes by clicking them in the Layer/Scene Explorer window. Wait for the calculations to finish.
After you add all meshes, test the rig and play around with the settings until you feel comfortable with it.
I find the best results with these options
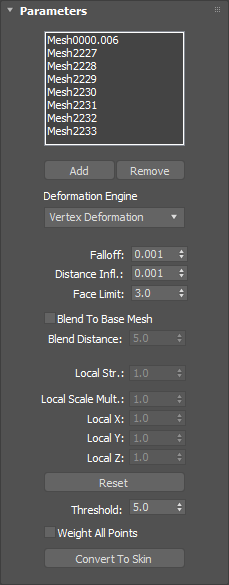
After you’re done, press the Convert to Skin button and delete the Skin Wrap modifier. It never gets exported and it just slows the scene down as it calculates the deformation. Keep in mind that sometimes you have to adjust the weight painting manually, as skin wrap is not perfect.