L2TP with IPSec Point to Point VPN setup on Mikrotik devices
This guide uses Mikrotik RB751U-2HnD as a client and a Mikrotik RB750GL as a VPN server. Both server and client are behind a NAT, server has dynamic IP and uses DDNS. This setup will allow approx. 5mb/s connection speed. This guide is basic and there’s many things to expand on. It is recommended to research how to harden the security of the VPN connection and on the VPN Server itself. L2TP w/ IPSec is the recommended VPN to be used, as Liberty Global doesn’t block it, its easy to setup without having to setup certificates, its widely supported (Windows doesn’t require a third party client) and supports IPSec tunneling encryption. Most Mikrotik devices have dedicated hardware for encrypting and decrypting traffic with L2TP VPN that doesn’t strain the hardware heavily, unlike OVPN is CPU only bound.
Disclaimer
This guide is for educational purposes only. For better security, its HEAVILY recommended to use OpenVPN or IKEv2 instead of L2TP with IPSec.
Setting up L2TP VPN Server
It is heavily recommended to create a specific DHCP IP Pool for local clients and VPN connections. For extra security, you could also create a completely new IP subnet. After creating a new VPN pool, go to the PPP menu and create two profiles called vpn-server and vpn-client. Don’t use the default profiles as they’re insecure.
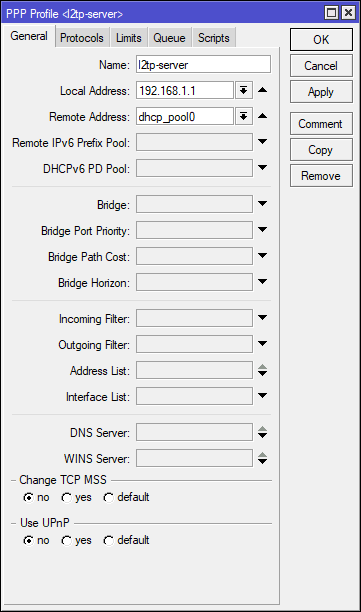
L2TP profile setup
First setup the vpn-server profile. Set the Local Address to the IP address of the router and select the DHCP pool for VPN connections in the Remote Address selection. In the protocols tab, I’d recommend leaving MPLS and compression to default and set encryption to required. Open up the vpn-client profile and leave the Local Address and Remote Address blank. Make sure that the Protocols tab is the same between the two profiles.
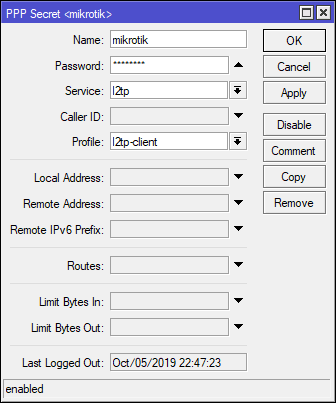
Creating VPN users
To create a new VPN user, go to the Secrets tab of PPP and create a new secret. Name is the username you will be connecting with. Select l2tp as a service and use the vpn-client profile.
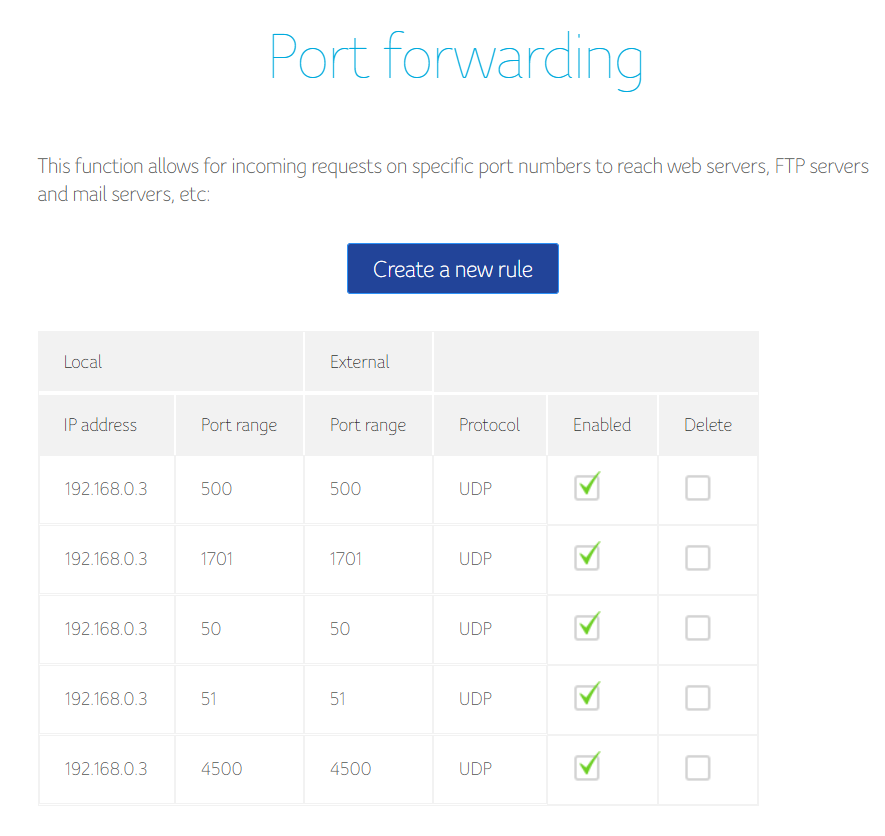
Port forwarding
In order for the VPN to work, we need to allow these protocols and ports on the Mikrotik and any other device if behind a NAT.
- 1701 UDP - L2TP - under
l2tpprotocol in firewall - 50 UDP- Encapsulation Header (ESP) - under
ipsec-espprotocol in firewall - 51 UDP - Authentication Header (AH) - under
ipsec-ahprotocol in firewall - 500 UDP - Internet Key Exchange (IKE, used for L2TP over IPsec)
- 4500 UDP - NAT traversal
If you are a customer of a provider under Liberty Global (UPC, Virgin Media,…) you need to request a public IP address, as you will be under a carrier grade NAT.
Setting up L2TP Server
In the PPP menu under Interface, click on the L2TP Server. Select the vpn-server profile in the Default Profile menu, define a long IPSec secret (recommended 20+ characters long randomly generated string) and define an Authentication protocol. I’d suggest to use either mschap2 or chap. Both are weak, but still stronger than mschap1 or pap. Since we’re using IPSec tunnel, the authentication will be encrypted through the tunnel. We can now enable the VPN server. We don’t have to touch any other IPSec settings, as the router will do it for us on client connection. To test it, setup the VPN on your profile and try to connect.
Connecting to the L2TP Server
On the client Mikrotik, open up the PPP window and create a new profile with the same settings as the vpn-client on the server. After that, go back to the interface tab and create a new L2TP Client interface. The Connect To field can be either a domain URL or an IP address. Use the vpn-client profile and fill out the required details.
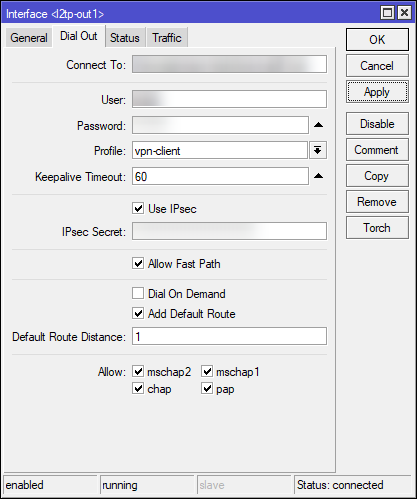
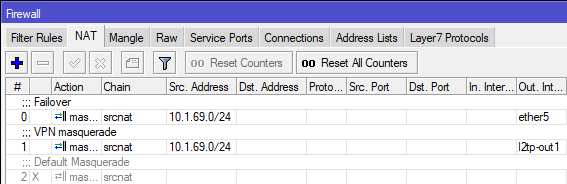
If you want to route all of the traffic through the VPN, enable Add Default Route. This will create a new masquerade NAT rule in Firewall with source address of your network (for example 10.1.69.0/24) with out interface being l2tp-out1`. You need to disable the default masquerade rule that gives you Internet access to force the router to push all network through the VPN tunnel.